

openssl自签一个给网站用的证书
limitless原创
openssl自签一个给网站用的证书 – 知乎 (zhihu.com)
重要说明:
说明:在这个文章中,整体流程存在一个问题:签发的CA证书不符合
X509v3 Basic Constraints: critical的规范,这会导致在Android11以及以上版本的移动设备上无法安装CA证书。在此提供正确的签发方法。
openssl签发CA和ssl/tls证书(新版,修复了之前版本的CA证书不规范的问题) – limitless
以修复后版本的文章为准
0. 前言
这篇文章是一篇备忘录性质的笔记。用于物联网设备或网站的内部测试。
(当然你在“特洛伊”,“微脉斯”,“酸酸乳”等场景用的话也行)
如果你想获得一些基础知识,可以看看这个文章:
关于加密、证书的那些事 – IOT物联网小镇 – 博客园 (cnblogs.com)www.cnblogs.com/sewain/p/14250884.html#ssltls
众所周知,证书(certificate)被广泛应用于各种加密场所。比如你现在如果使用网页浏览器刷知乎的话,就可以看到左上角的“连接安全”标志。
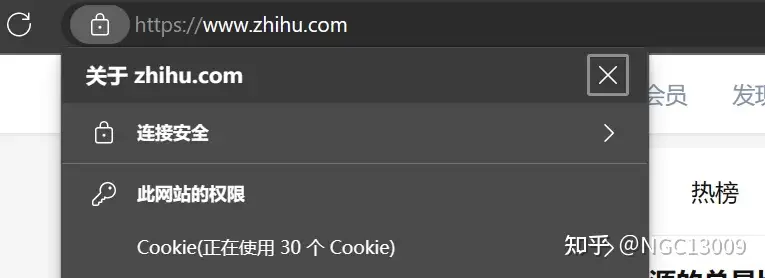
证书是一种基于RSA类算法的非对称加密方法,通过使用已经预装在操作系统中的根证书,可以验证你浏览的网页是真正的网页,而不是被黑客伪造的。同时在建立连接后,使用RSA加密随机生成的AES密钥,在服务器与客户机之间建立了一个绝对不可能有第三方破解的加密信道,从而极大捍卫了通信的可靠性。
具体的废话就不说了,估摸着能看到这篇文章的人对非对称加密体系基本上应该是有了解的,如果不了解,可以阅读:
爱码叔:图文彻底搞懂非对称加密(公钥密钥)173 赞同 · 32 评论文章
上面的比较通俗易懂,如果你数学很好,可以了解下基于自然数的RSA加密算法
zhengzhengshu:一文搞懂RSA算法50 赞同 · 3 评论文章
或者加密性能更强的ECDSA算法
Datacruiser:一文读懂ECDSA算法如何保护数据263 赞同 · 35 评论文章
现在的网站加密基本上都是使用SSL证书或者TLS证书。
本文将不会详细说明具体的原理以及操作细节,因为openssl的操作太多了,我只是急着用,赶紧生成一个就行了。所以跟着这篇文章,你至少能较快的搞出来一个自签的证书,包括自签的根证书以及二级证书。用于测试环境绰绰有余了。
注意:自签证书无法像权威根证书那样随意的吊销子证书,同时你也没法像权威证书那样,让每个用户设备都能自带你的权威证书(因为你不权威)。所以可以用于测试环境或自己用,上线还是算了。当然,物联网设备啊什么的当然可以随意使用。只要你能确保server和client人手一个根证书,能验证身份就行。
1. 搞一个openssl
我记得现在的Windows系统是自带的,比如你按住shift在桌面启动一个PowerShell, 输入openssl,发现是能直接用的

如果没有的话,尝试安装一个,配好环境变量(把openssl的可执行文件所在的目录加入环境变量中,此处不展开)
下文将假设你的操作是在 ~ 目录下,你可以更换你自己的目录,比如桌面上新建一个文件夹,下文的所有操作皆与绝对路径无关,请随意。
2. 设置openssl.cnf
openssl.cnf是openssl自动配置x509格式的证书所使用的一个配置文件,一般默认即可。你当然也可以网上查一查应该怎么设置这个东西。
为了方便起见,你可以直接复制以下的配置,粘贴到~/下。我们不用默认位置,我们使用一个参数来调用本地的配置。
#
# OpenSSL example configuration file.
# This is mostly being used for generation of certificate requests.
#

# Note that you can include other files from the main configuration
# file using the .include directive.
#.include filename

# This definition stops the following lines choking if HOME isn't
# defined.
HOME			= .

# Extra OBJECT IDENTIFIER info:
#oid_file		= $ENV::HOME/.oid
oid_section		= new_oids

# To use this configuration file with the "-extfile" option of the
# "openssl x509" utility, name here the section containing the
# X.509v3 extensions to use:
# extensions		=
# (Alternatively, use a configuration file that has only
# X.509v3 extensions in its main [= default] section.)

[ new_oids ]

# We can add new OIDs in here for use by 'ca', 'req' and 'ts'.
# Add a simple OID like this:
# testoid1=1.2.3.4
# Or use config file substitution like this:
# testoid2=${testoid1}.5.6

# Policies used by the TSA examples.
tsa_policy1 = 1.2.3.4.1
tsa_policy2 = 1.2.3.4.5.6
tsa_policy3 = 1.2.3.4.5.7

####################################################################
[ ca ]
default_ca	= CA_default		# The default ca section

####################################################################
[ CA_default ]

dir		= ./demoCA		# Where everything is kept
certs		= $dir/certs		# Where the issued certs are kept
crl_dir		= $dir/crl		# Where the issued crl are kept
database	= $dir/index.txt	# database index file.
#unique_subject	= no			# Set to 'no' to allow creation of
					# several certs with same subject.
new_certs_dir	= $dir/newcerts		# default place for new certs.

certificate	= $dir/cacert.pem 	# The CA certificate
serial		= $dir/serial 		# The current serial number
crlnumber	= $dir/crlnumber	# the current crl number
					# must be commented out to leave a V1 CRL
crl		= $dir/crl.pem 		# The current CRL
private_key	= $dir/private/cakey.pem# The private key

x509_extensions	= usr_cert		# The extensions to add to the cert

# Comment out the following two lines for the "traditional"
# (and highly broken) format.
name_opt 	= ca_default		# Subject Name options
cert_opt 	= ca_default		# Certificate field options

# Extension copying option: use with caution.
# copy_extensions = copy

# Extensions to add to a CRL. Note: Netscape communicator chokes on V2 CRLs
# so this is commented out by default to leave a V1 CRL.
# crlnumber must also be commented out to leave a V1 CRL.
# crl_extensions	= crl_ext

default_days	= 365			# how long to certify for
default_crl_days= 30			# how long before next CRL
default_md	= default		# use public key default MD
preserve	= no			# keep passed DN ordering

# A few difference way of specifying how similar the request should look
# For type CA, the listed attributes must be the same, and the optional
# and supplied fields are just that :-)
policy		= policy_match

# For the CA policy
[ policy_match ]
countryName		= match
stateOrProvinceName	= match
organizationName	= match
organizationalUnitName	= optional
commonName		= supplied
emailAddress		= optional

# For the 'anything' policy
# At this point in time, you must list all acceptable 'object'
# types.
[ policy_anything ]
countryName		= optional
stateOrProvinceName	= optional
localityName		= optional
organizationName	= optional
organizationalUnitName	= optional
commonName		= supplied
emailAddress		= optional

####################################################################
[ req ]
default_bits		= 2048
default_keyfile 	= privkey.pem
distinguished_name	= req_distinguished_name
attributes		= req_attributes
x509_extensions	= v3_ca	# The extensions to add to the self signed cert

# Passwords for private keys if not present they will be prompted for
# input_password = secret
# output_password = secret

# This sets a mask for permitted string types. There are several options.
# default: PrintableString, T61String, BMPString.
# pkix	 : PrintableString, BMPString (PKIX recommendation before 2004)
# utf8only: only UTF8Strings (PKIX recommendation after 2004).
# nombstr : PrintableString, T61String (no BMPStrings or UTF8Strings).
# MASK:XXXX a literal mask value.
# WARNING: ancient versions of Netscape crash on BMPStrings or UTF8Strings.
string_mask = utf8only

# req_extensions = v3_req # The extensions to add to a certificate request

[ req_distinguished_name ]
countryName			= Country Name (2 letter code)
countryName_default		= AU
countryName_min			= 2
countryName_max			= 2

stateOrProvinceName		= State or Province Name (full name)
stateOrProvinceName_default	= Some-State

localityName			= Locality Name (eg, city)

0.organizationName		= Organization Name (eg, company)
0.organizationName_default	= Internet Widgits Pty Ltd

# we can do this but it is not needed normally :-)
#1.organizationName		= Second Organization Name (eg, company)
#1.organizationName_default	= World Wide Web Pty Ltd

organizationalUnitName		= Organizational Unit Name (eg, section)
#organizationalUnitName_default	=

commonName			= Common Name (e.g. server FQDN or YOUR name)
commonName_max			= 64

emailAddress			= Email Address
emailAddress_max		= 64

# SET-ex3			= SET extension number 3

[ req_attributes ]
challengePassword		= A challenge password
challengePassword_min		= 4
challengePassword_max		= 20

unstructuredName		= An optional company name

[ usr_cert ]

# These extensions are added when 'ca' signs a request.

# This goes against PKIX guidelines but some CAs do it and some software
# requires this to avoid interpreting an end user certificate as a CA.

basicConstraints=CA:FALSE

# Here are some examples of the usage of nsCertType. If it is omitted
# the certificate can be used for anything *except* object signing.

# This is OK for an SSL server.
# nsCertType			= server

# For an object signing certificate this would be used.
# nsCertType = objsign

# For normal client use this is typical
# nsCertType = client, email

# and for everything including object signing:
# nsCertType = client, email, objsign

# This is typical in keyUsage for a client certificate.
# keyUsage = nonRepudiation, digitalSignature, keyEncipherment

# This will be displayed in Netscape's comment listbox.
nsComment			= "OpenSSL Generated Certificate"

# PKIX recommendations harmless if included in all certificates.
subjectKeyIdentifier=hash
authorityKeyIdentifier=keyid,issuer

# This stuff is for subjectAltName and issuerAltname.
# Import the email address.
# subjectAltName=email:copy
# An alternative to produce certificates that aren't
# deprecated according to PKIX.
# subjectAltName=email:move

# Copy subject details
# issuerAltName=issuer:copy

#nsCaRevocationUrl		= http://www.domain.dom/ca-crl.pem
#nsBaseUrl
#nsRevocationUrl
#nsRenewalUrl
#nsCaPolicyUrl
#nsSslServerName

# This is required for TSA certificates.
# extendedKeyUsage = critical,timeStamping

[ v3_req ]

# Extensions to add to a certificate request

basicConstraints = CA:FALSE
keyUsage = nonRepudiation, digitalSignature, keyEncipherment

[ v3_ca ]


# Extensions for a typical CA


# PKIX recommendation.

subjectKeyIdentifier=hash

authorityKeyIdentifier=keyid:always,issuer

basicConstraints = critical,CA:true

# Key usage: this is typical for a CA certificate. However since it will
# prevent it being used as an test self-signed certificate it is best
# left out by default.
# keyUsage = cRLSign, keyCertSign

# Some might want this also
# nsCertType = sslCA, emailCA

# Include email address in subject alt name: another PKIX recommendation
# subjectAltName=email:copy
# Copy issuer details
# issuerAltName=issuer:copy

# DER hex encoding of an extension: beware experts only!
# obj=DER:02:03
# Where 'obj' is a standard or added object
# You can even override a supported extension:
# basicConstraints= critical, DER:30:03:01:01:FF

[ crl_ext ]

# CRL extensions.
# Only issuerAltName and authorityKeyIdentifier make any sense in a CRL.

# issuerAltName=issuer:copy
authorityKeyIdentifier=keyid:always

[ proxy_cert_ext ]
# These extensions should be added when creating a proxy certificate

# This goes against PKIX guidelines but some CAs do it and some software
# requires this to avoid interpreting an end user certificate as a CA.

basicConstraints=CA:FALSE

# Here are some examples of the usage of nsCertType. If it is omitted
# the certificate can be used for anything *except* object signing.

# This is OK for an SSL server.
# nsCertType			= server

# For an object signing certificate this would be used.
# nsCertType = objsign

# For normal client use this is typical
# nsCertType = client, email

# and for everything including object signing:
# nsCertType = client, email, objsign

# This is typical in keyUsage for a client certificate.
# keyUsage = nonRepudiation, digitalSignature, keyEncipherment

# This will be displayed in Netscape's comment listbox.
nsComment			= "OpenSSL Generated Certificate"

# PKIX recommendations harmless if included in all certificates.
subjectKeyIdentifier=hash
authorityKeyIdentifier=keyid,issuer

# This stuff is for subjectAltName and issuerAltname.
# Import the email address.
# subjectAltName=email:copy
# An alternative to produce certificates that aren't
# deprecated according to PKIX.
# subjectAltName=email:move

# Copy subject details
# issuerAltName=issuer:copy

#nsCaRevocationUrl		= http://www.domain.dom/ca-crl.pem
#nsBaseUrl
#nsRevocationUrl
#nsRenewalUrl
#nsCaPolicyUrl
#nsSslServerName

# This really needs to be in place for it to be a proxy certificate.
proxyCertInfo=critical,language:id-ppl-anyLanguage,pathlen:3,policy:foo

####################################################################
[ tsa ]

default_tsa = tsa_config1	# the default TSA section

[ tsa_config1 ]

# These are used by the TSA reply generation only.
dir		= ./demoCA		# TSA root directory
serial		= $dir/tsaserial	# The current serial number (mandatory)
crypto_device	= builtin		# OpenSSL engine to use for signing
signer_cert	= $dir/tsacert.pem 	# The TSA signing certificate
					# (optional)
certs		= $dir/cacert.pem	# Certificate chain to include in reply
					# (optional)
signer_key	= $dir/private/tsakey.pem # The TSA private key (optional)
signer_digest  = sha256			# Signing digest to use. (Optional)
default_policy	= tsa_policy1		# Policy if request did not specify it
					# (optional)
other_policies	= tsa_policy2, tsa_policy3	# acceptable policies (optional)
digests     = sha1, sha256, sha384, sha512  # Acceptable message digests (mandatory)
accuracy	= secs:1, millisecs:500, microsecs:100	# (optional)
clock_precision_digits  = 0	# number of digits after dot. (optional)
ordering		= yes	# Is ordering defined for timestamps?
				# (optional, default: no)
tsa_name		= yes	# Must the TSA name be included in the reply?
				# (optional, default: no)
ess_cert_id_chain	= no	# Must the ESS cert id chain be included?
				# (optional, default: no)
ess_cert_id_alg		= sha1	# algorithm to compute certificate
				# identifier (optional, default: sha1)
3. 创建工作文件夹
这里参考了
mkdir certs
mkdir private
certs目录:存放已颁发的证书文件
private目录:存放私钥文件
4. 生成一个随机数用于加密
openssl rand -out private/.rand 1000指令在PowerShell中运行。
5. 生成根证书私钥PEM
根证书就是你自己的CA,用于作为受信任的证书存储在所有设备中(包括所有server与client)。如果你的设备没有安装根证书的话,在访问网页时会有警告“不受信任的证书,该证书无法证明它的来源”。换而言之,陌生人需要有熟人来介绍,你才能信任他对吧?所以此时一个根证书不在你的计算机上的证书过来了,你找不到他的身份验证信息,自然无法确认真伪,那么就有可能是冒充的(被中间人攻击的)。
所以如果需要安全的话,必须由可靠的方式得到正确的根证书,并安装到信任的根证书列表中,下次访问网站就不会提示不信任了。当然,不安装也能访问,就是多一遍手续,而且还可能被攻击。
其实当然可以直接生成一个证书。但是带有根证书的方式有个好处:如果一些场合,例如物联网设备,需要给每一个设备指定一个证书(进行双向验证,必须是注册过的设备才能连接。而不是像网页这样,一般服务器是不验证用户的身份的。)如果每个用户的证书都是单独的,那么服务器需要存储太多证书了!如果有根证书的话,就可以一级级验证了,而不用存储每个证书。(类似于找一个大家都认识的人做保安)
证书需要一个私钥,用于留在本地,加密需要的信息,使用如下指令生成私钥:
openssl genrsa -aes256 -out private/cakey.pem 8192会提示你输入一个密码,防止丢失私钥被别人给用了。这个密码的安全性远低于私钥本身,所以私钥一定不能公开!
这一步使用AES256进行加密,生成cakey.pem作为CA的私钥存储。
8192是密钥长度,越长越难以破解。一般4096就已经无法被太阳系总算力在几千年内破解了。
6. 生成根证书签发申请文件CSR
在正式的证书申请时,你需要向权威机构提交一个证书申请(类似于你去街道办,需要开个办理事项表格,给他们,他们才会给你办事,所谓形式一定要到位)。这个证书申请包括了一些信息,比如你的组织,公司名称,联系方式等,权威机构会通过其他方式确认你的合法身份(比如线下开会,交钱等方式,比如知乎去申请证书,权威机构首先得知道你确实是知乎,而不是谁冒充申请的),并向你颁发证书。
生成证书请求文件(csr文件)的命令如下:
openssl req -new -key private/cakey.pem -out private/ca.csr -config ./openssl.cnf该指令会使用刚才设置好的openssl配置文件,而不用使用默认的配置文件。因为Windows系统有时候是没有这个默认的文件的,不像Linux那么自动化。
输入后会提示输入一大堆信息。例如国家简码,地区,什么的,如实填写或者不写都可以。根证书无所谓。如果你想要点仪式感,那么就认真写。最终这些信息会出现在证书的信息中。
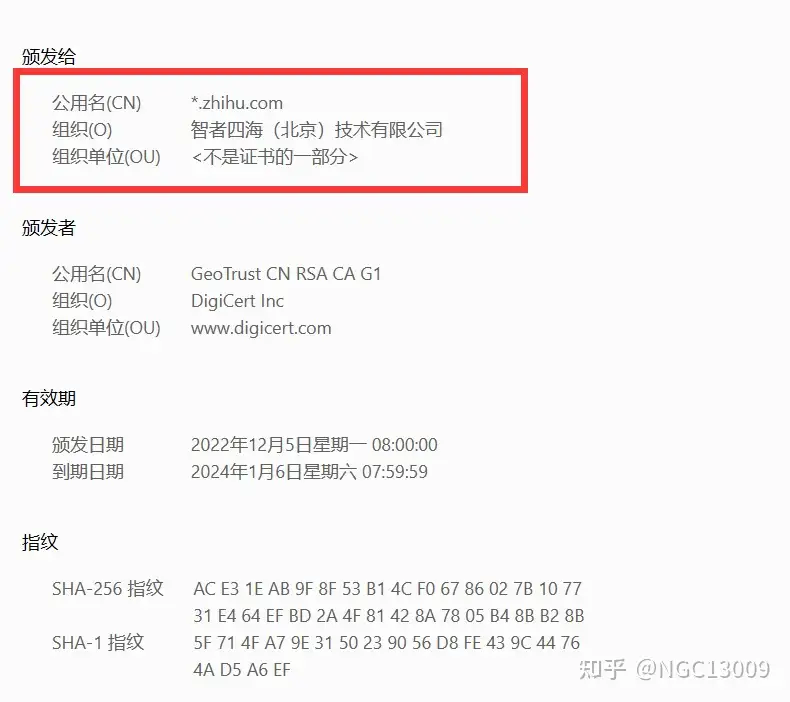
这一步可能需要输入你刚才设置的PEM密码。
7. 签发根证书 CER
根证书的私钥,签发请求文件也有了,可以自己给自己颁发一个证书了。这个生成的证书就是公钥,包含了证书持有组织的信息,以及公钥,公钥的哈希校验。后面使用该根证书签发的证书都可以递归到该证书,证明可信。
根证书公钥需要存储在所有设备中。而且必须是通过“可信的”方式。因为其他证书能靠根证书验证真伪,但是它自己没办法验证自己。你可以通过生成后,使用u盘线下做高铁在两个服务器间传输,或者使用已经建立好的可信加密信道,或者传送过去然后通过电话等手段验证哈希值等。
对于咱们平时上网来说,根证书是随着操作系统,在出厂时就安装好的,无需用户操心。(你也信任生产商对吧?所以买大牌子比较好,野鸡牌子和野鸡操作系统就有可能夹带私货)
你自己签发的证书,用于测试的话,其实不安装根证书也无妨,大不了警告一下。比如你在内网测试,你的内网是可信的,那么就无所谓。
使用这个指令签发根证书:
openssl x509 -req -days 3650 -sha256 -extensions v3_ca -signkey private/cakey.pem -in private/ca.csr -out certs/ca.cer根证书加密很强,有效期10年问题不大。证书的过期是指赶在黑客还没来得及破解之前搞出新密码,这样,只要破解密码的时间大于加密有效期时间,它就绝对安全。
校验算法尽量使用sha256,sha1已经找到暴力撞值的方法了,可能不太安全。
8. 安装根证书
Windows下双击,安装。
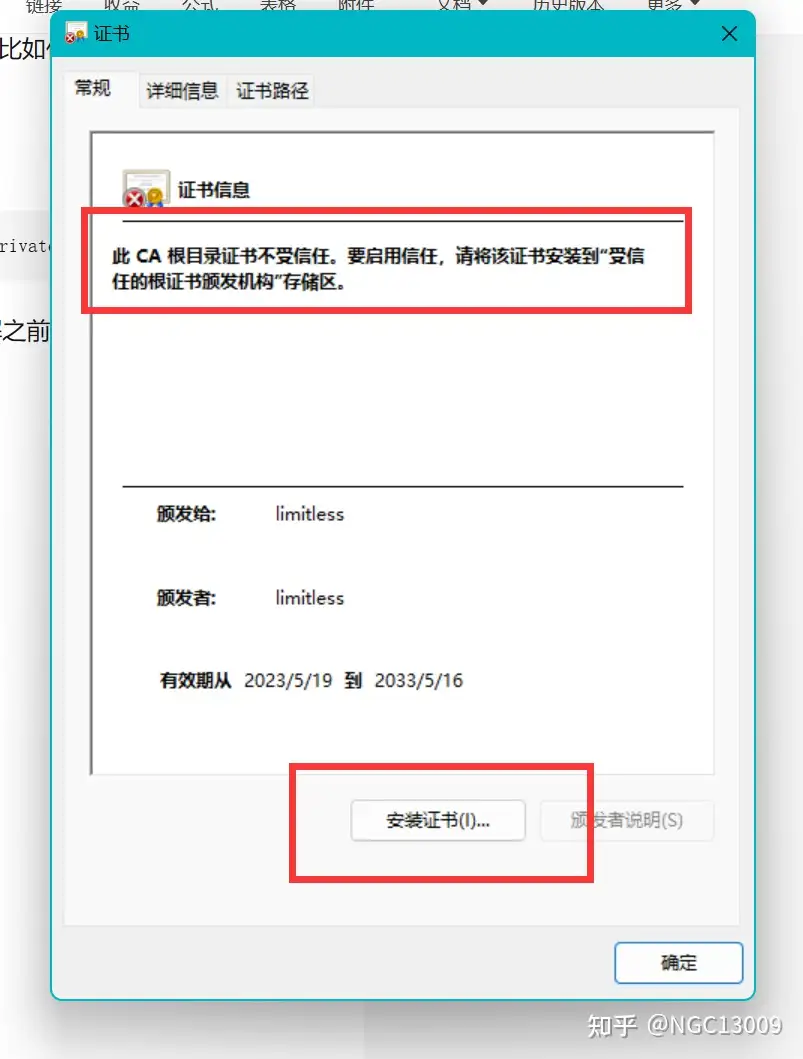
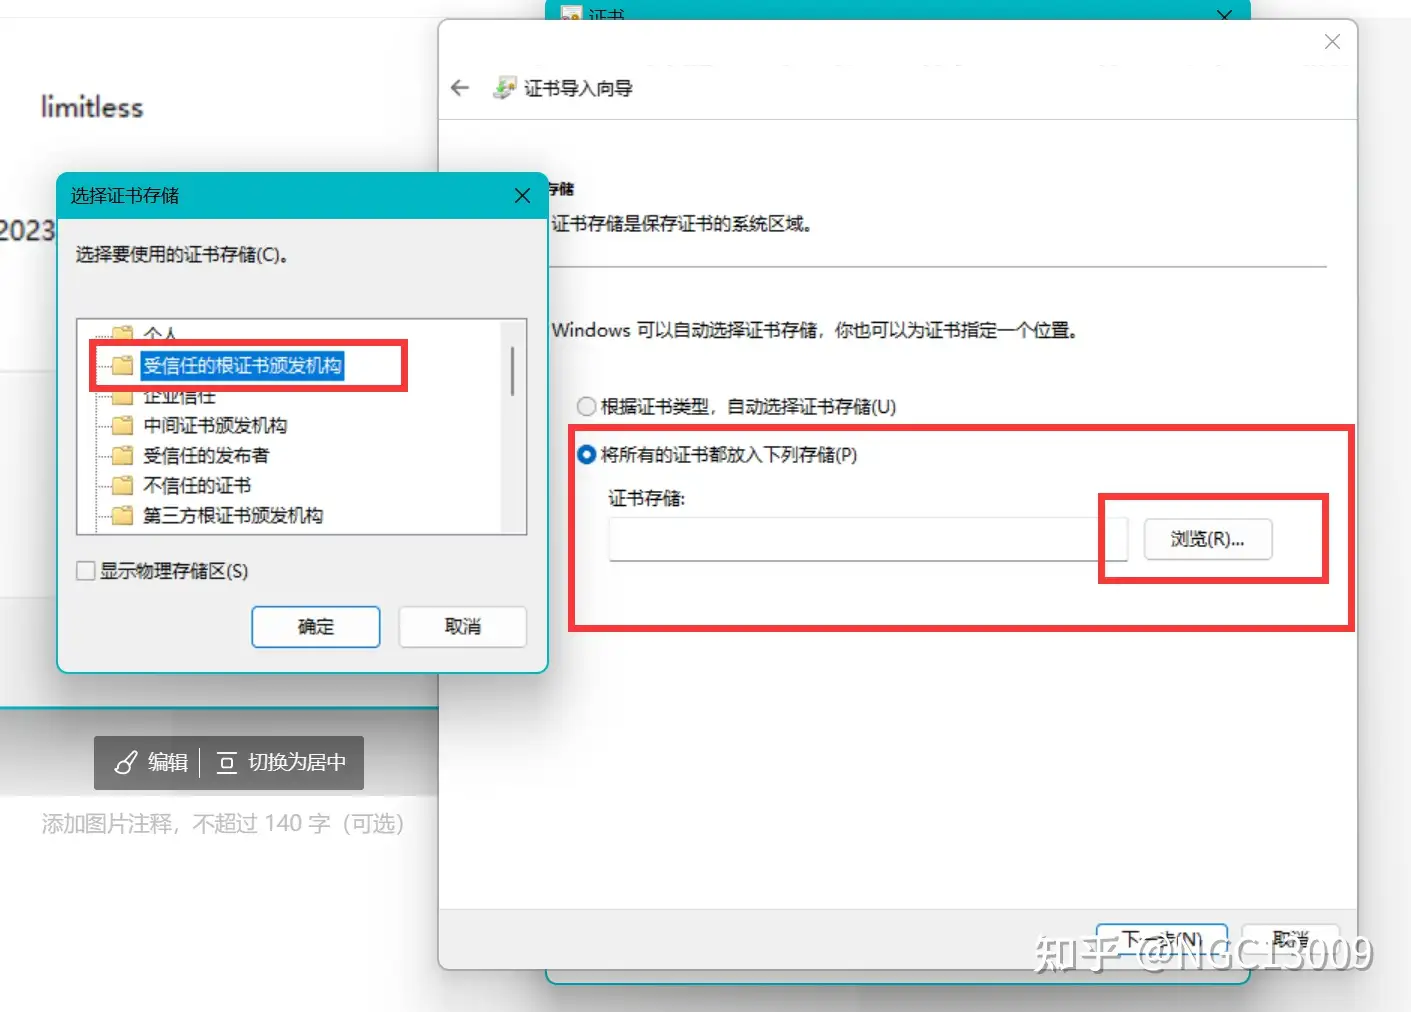
一定是这个位置。
如果安装后需要卸载的话,去证书管理器
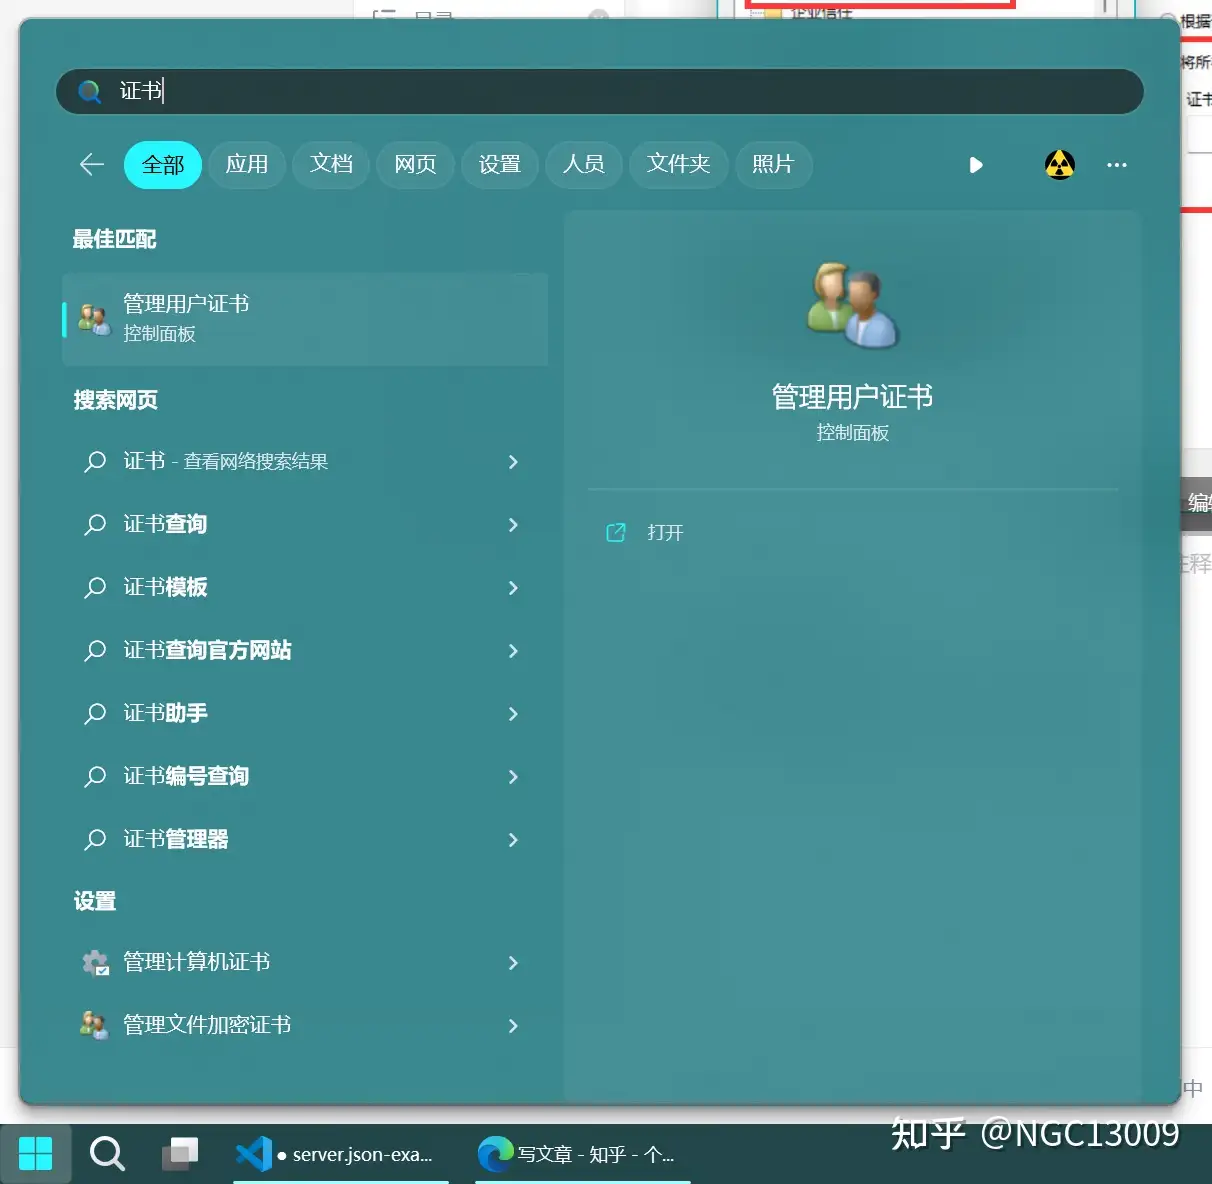
把他卸载掉就好了。安装到哪里就从哪里卸载。
注意别卸载错了!这里平时尽量不要乱动!
9. 生成网站用的私钥PEM
刚才的证书是根证书,作为CA的存在。现在我们拿CA去给网站,物联网设备,或者乱七八糟的业务去签发各自的证书。这样他们的证书都能使用CA来验证合法性了。
每个网站都有一个自己的子证书。
证书可以层层嵌套下去,你即使只有子证书,也可以给自己颁发孙子证书。但是在这里,我们只需要二级就够了。
实际中,显然越靠近权威根证书,则证书越权威,置信度越高,花钱买的话就越贵。
生成业务用的私钥:
openssl genrsa -aes256 -out private/server.key 2048
openssl rsa -in private/server.key -out certs/server.key
一般来说,子证书的存续时间与加密强度都不如根证书。
子证书是需要颁发出去的。根证书的私钥只有签发机关有,但是子证书的私钥必须给各自的业务服务器,要不然怎么加密?所以到时候这个私钥是需要部署到服务器上的。第二行代码就是干这个的。
此处可能提示设置密码。此处的密码不建议和CA的密码相同。
10. 生成网站用的请求文件CSR
刚才我们生成的是CA的请求文件,现在生成网站用的请求文件。一个道理,该包括什么信息就包括什么信息,设置同之前。
注意:由于是给网页使用的证书,所以请求文件中的“common name”必须设置成网站域名。
比如知乎的这个“公用名”就是*.zhihu.com。这是一个泛解析域名, 只有common name和网站一样的话,证书才是合格的。否则浏览器会认为你访问了一个假冒的网站。你明明是A网站,为啥持有B的证书?
此步骤切记。
一定注意 common name 的值。其他的可以随意或不填。
openssl req -new -key private/server.key -out private/server.csr -config ./openssl.cnf11. 准备嵌入证书中的域名信息
有时候,在网站中,即使 common name 和域名是一样的,浏览器仍然会提示NET::ERR_CERT_COMMON_NAME_INVALID错误。这是因为证书没有正确的嵌入域名信息。
请创建一个文件 ~/private/server.dns.ext ,然后使用记事本或者nano,vim,vsc等软件打开,粘贴以下信息:
keyUsage = nonRepudiation, digitalSignature, keyEncipherment
extendedKeyUsage = serverAuth, clientAuth
subjectAltName=@SubjectAlternativeName

[ SubjectAlternativeName ]
DNS.1=your.domain.name
DNS.2=此处填写你的网站的域名.cn
DNS.3=如果有多个域名就这么增加.com
DNS.4=*.当然支持泛解析域名.net
后面会使用这个文件。
如果你没有域名,而是持有一个固定IP,那么使用如下文件,请创建一个文件 ~/private/server.ip.ext ,然后使用记事本或者nano,vim,vsc等软件打开,粘贴以下信息:
keyUsage = nonRepudiation, digitalSignature, keyEncipherment
extendedKeyUsage = serverAuth, clientAuth
subjectAltName=@SubjectAlternativeName

[SubjectAlternativeName]
IP.1=192.168.1.2
IP.2=222.90.155.789
后面用哪个就附加哪个。一般来说,只需要域名的信息就行了。
12. 使用CA签发网页的证书CRT
openssl x509 -req -days 730 -CA certs/ca.cer -CAkey private/cakey.pem -CAserial ca.srl -CAcreateserial -in private/server.csr -out certs/server.crt -extfile private/server.dns.ext上面的指令是使用刚才创建的域名文件附加信息。如果需要使用IP,那么改一下最后的文件名即可。
13. 如果你使用IIS作为网页服务器,那么需要生成PFX文件
PFX是一个用在IIS上的私钥+公钥合成的文件,这样你只需要导入一个文件到IIS即可。但是我们现在有两个文件:CRT和KET,分别是网站要用的证书公钥与私钥。好在openssl集成了这个功能。
CRT和CER大差不差,都是公钥,格式上略有区别。不过在这里一般认为没什么区别。
openssl pkcs12 -export -in certs/server.crt -inkey certs/server.key -out certs/server.pfx需要设置密码。
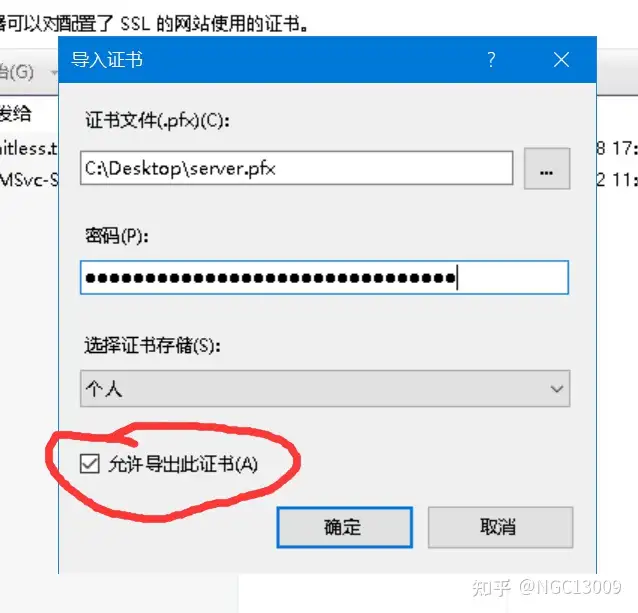
14. 给IIS导入PFX文件,并为网站添加证书。
网上nginx,tomcat,apache的添加证书的方法很多,这里说一下IIS怎么添加。
14.1. 首先把CA和网站的PFX证书复制到服务器上
这点Windows的远程桌面确实好用,可以隔空粘贴。
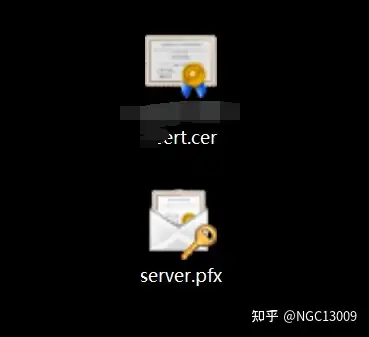
14.2. 然后安装CA的公钥。
必须安装。双击CER,将它添加到受信任的根证书列表去。就和刚才“8. 安装根证书”的方法一样。
14.3. 把PFX加入证书清单
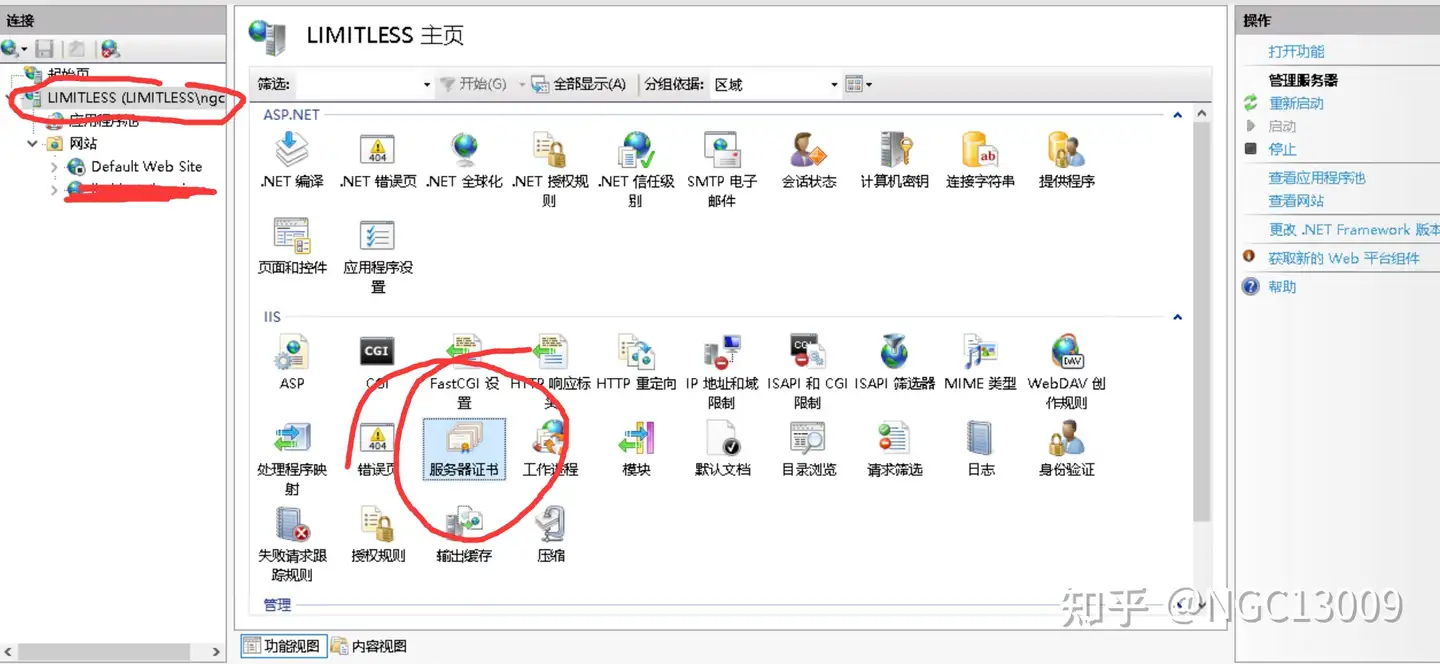
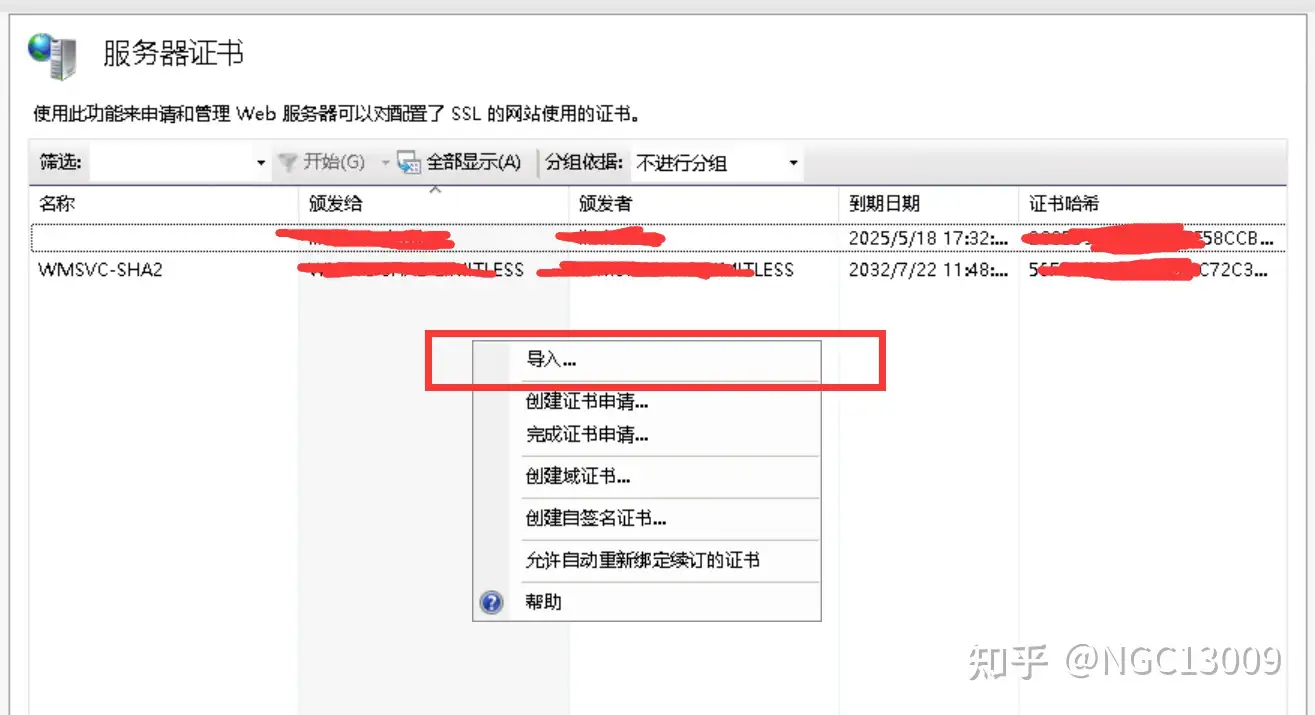
14.4. 去网站添加绑定
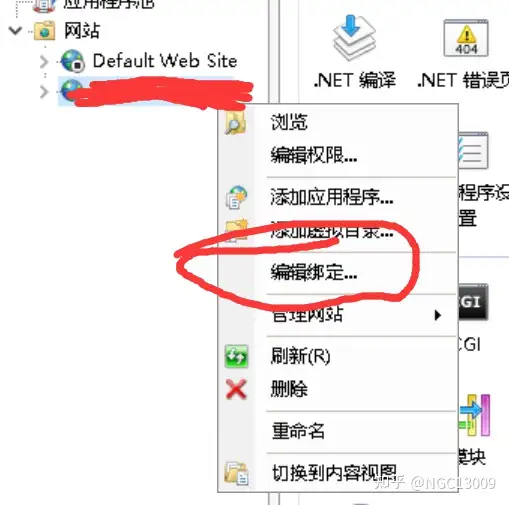
给网站绑定添加上自己的证书。注意必须是https类型。
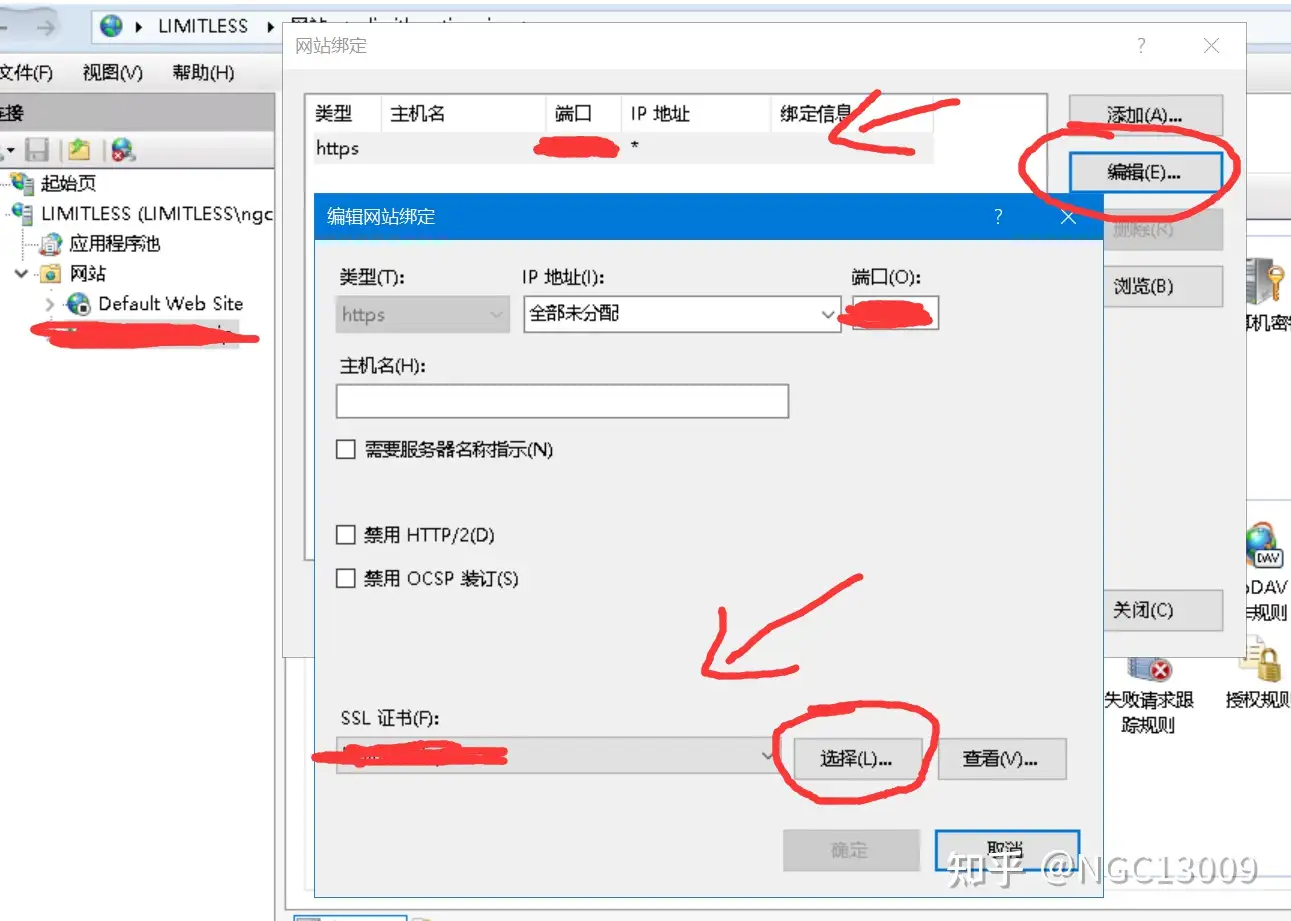
大功告成!
现在你访问你的测试网站,应该已经有“此连接安全”的提示了。